Pro plan feature
Custom dash card templates are available on the Pro plan. On other plans shows use the built-in layout picker, and the Card templates menu item and the template drop-down on Edit Show don't appear.
Not a coder? Make a custom dash card from an image with AI has copy-and-paste prompts that turn a flyer or sketch into a file that follows these rules.
Adding your template to the library
Templates live in a library shared by your whole organisation. Open Card templates in the organiser menu (just above Settings). Enter a Template name, choose the Page setting, choose your .html file (up to 200 KB) and add it.
The Page setting is either Landscape (297 x 210 mm) or Portrait A5 (148 x 210 mm). It sets the print page size for the template, whatever layout the show itself uses, so choose the one your design is built for.
The library lists each template with two small previews (one as a People's Choice car, one as a judged car), its page setting, how many shows use it and when it was last updated. You can rename a template, change its page setting, replace its file or delete it. A template that a show still uses can't be deleted: choose another template, or the built-in layout, on those shows first. A club can keep up to 5 templates on the Pro and Enterprise plans, and 1 on any other plan (a club a super admin has switched on); at the limit, delete one you no longer use to add another. Replacing a template's file doesn't count towards the limit.
Choosing a template for a show
Open the show, click Edit and use the Custom dash card template drop-down. It lists your templates plus Built-in layout. Pick one and save. Every later print run for that show uses it. To go back to the built-in layouts, choose Built-in layout. Copying a show keeps its template choice.
Editing or replacing a template changes the cards of every show that uses it. If you want to try a change without touching a show that is already set up, add the new version as a separate template and pick it on one show first.
What the upload checks
- File extension must be .html
- File size must be under 200 KB
- Scripts, forms, embedded frames and event handlers (such as onclick) are removed when you upload
- External stylesheets are allowed in the file but won't load at print time (see tips below)
Merge tags reference
Write your HTML with placeholder tags in double curly braces. At print time, the server replaces each tag with the real value for that entrant. The Card templates page has a collapsible "Available merge tags" panel if you need a quick reminder while you're working.
| Tag | What it outputs |
|---|---|
| {{show_name}} | Name of the show |
| {{show_date}} | Formatted show date |
| {{show_venue}} | Venue name |
| {{car_number}} | Entrant's car number |
| {{entrant_name}} | Entrant's full name (built-in cards print first name and last initial) |
| {{vehicle_year}} | Vehicle year |
| {{vehicle_make}} | Vehicle make |
| {{vehicle_model}} | Vehicle model |
| {{vehicle_variant}} | Trim / variant the owner typed, such as SS 396 (may be blank) |
| {{vehicle_color}} | Vehicle color |
| {{class}} | Class name, or the class's dash card name when one is set |
| {{status_label}} | JUDGED for a car whose class is Excluded in People's Choice (Grouped mode); PEOPLE'S CHOICE for any other car when People's Choice is on; blank when it is off |
| {{qr_label}} | "Scan to vote" on a car that can be voted on, otherwise "Scan for details" |
| {{qr_url}} | QR code image URL — use in <img src="..."> |
| {{logo_url}} | Show logo URL — use in <img src="..."> |
| {{title_sponsors_html}} | Pre-rendered block of all title sponsor logos and names |
| {{supporting_sponsors_html}} | Pre-rendered block of all supporting sponsor logos and names |
| {{all_sponsors_html}} | All sponsors combined in one block |
| {{title_sponsor_1_logo}} | First title sponsor logo URL |
| {{title_sponsor_1_name}} | First title sponsor name |
| {{title_sponsor_2_logo}} | Second title sponsor logo URL |
| {{title_sponsor_2_name}} | Second title sponsor name |
Tags that have no value for a given show — a show with no logo, for example — are replaced with an empty string. Design defensively: don't rely on a sponsor logo being present unless you know you always have one.
Where the template is used
Your template applies only to the organiser print pages: bulk Print Dash Cards and the single-card print page. The entrant's own card page and the public car page always show the built-in layout. Bike entries always print the built-in bike card.
Using {{status_label}} as a headline
When some classes are judged and others are voted on (People's Choice in Grouped mode), put {{status_label}} in a large heading. Cars in an Excluded class print JUDGED, every other car prints PEOPLE'S CHOICE, and the heading is empty when People's Choice is off. Pair it with {{qr_label}} under the QR code.
<div style="font-size: 36pt; font-weight: 900; text-align: center;">
  {{status_label}}
</div>
...
<img src="{{qr_url}}" alt="QR code" />
<p>{{qr_label}}</p>
A complete working template
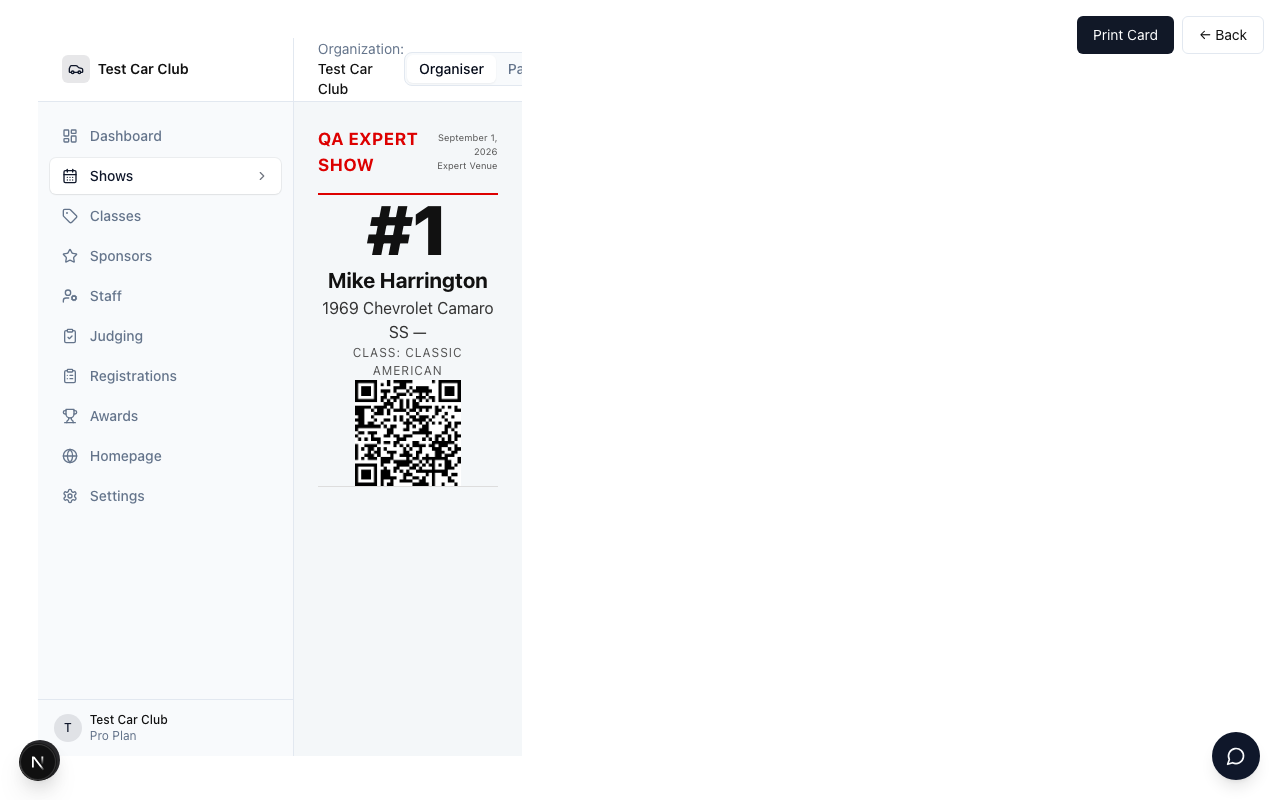
Here is a minimal but complete template that produces a clean A5 portrait dash card. It uses inline CSS only, sets the correct page size for printing, and places the key fields in a layout that reads well from the kerb. Copy it, adjust the colours and fonts to match your club, and add it to your library as a Portrait A5 template.
<!DOCTYPE html>
<html lang="en">
<head>
  <meta charset="UTF-8" />
  <title>Dash Card</title>
  <style>
    /* --- Page size and bleed --- */
    @media print {
      @page {
        size: 148mm 210mm;
        margin: 0;
      }
    }

    * { box-sizing: border-box; margin: 0; padding: 0; }

    body {
      width: 148mm;
      height: 210mm;
      font-family: Arial, Helvetica, sans-serif;
      background: #ffffff;
      color: #111111;
      padding: 10mm;
      display: flex;
      flex-direction: column;
      gap: 6mm;
    }

    /* --- Show header --- */
    .header {
      display: flex;
      align-items: center;
      justify-content: space-between;
      border-bottom: 2px solid #d00;
      padding-bottom: 4mm;
    }
    .show-name {
      font-size: 13pt;
      font-weight: 700;
      color: #d00;
      text-transform: uppercase;
      letter-spacing: 0.03em;
    }
    .show-meta {
      font-size: 7pt;
      color: #555;
      text-align: right;
      line-height: 1.5;
    }

    /* --- Car number --- */
    .car-number {
      font-size: 52pt;
      font-weight: 900;
      text-align: center;
      color: #111;
      line-height: 1;
    }

    /* --- Entrant details --- */
    .entrant-name {
      font-size: 16pt;
      font-weight: 700;
      text-align: center;
    }
    .vehicle {
      font-size: 12pt;
      text-align: center;
      color: #333;
    }
    .class-label {
      font-size: 9pt;
      text-align: center;
      color: #555;
      text-transform: uppercase;
      letter-spacing: 0.08em;
    }

    /* --- QR code --- */
    .qr-row {
      display: flex;
      justify-content: center;
      margin-top: auto;
    }
    .qr-row img {
      width: 28mm;
      height: 28mm;
    }

    /* --- Sponsors --- */
    .sponsors {
      border-top: 1px solid #ddd;
      padding-top: 3mm;
      text-align: center;
      font-size: 6pt;
      color: #888;
    }
  </style>
</head>
<body>

  <div class="header">
    <span class="show-name">{{show_name}}</span>
    <div class="show-meta">
      {{show_date}}<br />
      {{show_venue}}
    </div>
  </div>

  <div class="car-number">#{{car_number}}</div>

  <div class="entrant-name">{{entrant_name}}</div>
  <div class="vehicle">
    {{vehicle_year}} {{vehicle_make}} {{vehicle_model}}
    — {{vehicle_color}}
  </div>
  <div class="class-label">Class: {{class}}</div>

  <div class="qr-row">
    <img src="{{qr_url}}" alt="QR code" />
  </div>

  <div class="sponsors">
    {{title_sponsors_html}}
  </div>

</body>
</html>
A few things worth noting in that template. The @page rule sets the physical paper size so the browser's print dialog defaults to A5 — the organiser still needs to choose A5 in their printer settings, but the template declares the intent. The QR code is just an <img> tag pointing at the URL the server provides — no JavaScript required. And the margin-top: auto on the QR row pushes it to the bottom of the card regardless of how much text sits above it.
Sponsor placement
You have two approaches for sponsors. Use the pre-rendered blocks when you just want sponsors on the card and don't care exactly where each one sits. Use the individual tags when a sponsor has paid for a specific placement — large logo top-right, for instance — and you need precise control.
Option A — pre-rendered blocks (quick drop-in)
Drop {{title_sponsors_html}}, {{supporting_sponsors_html}}, or {{all_sponsors_html}} into your template. The server renders each sponsor's logo (if uploaded) and name into a horizontal flex row. You style the container; the server handles the individual sponsor elements. This is the right choice for most shows.
Option B — individual sponsor tags (precise placement)
Use {{title_sponsor_1_logo}} as an <img src> and {{title_sponsor_1_name}} as text wherever you want them. Repeat for title_sponsor_2. This works when you have a naming-rights sponsor who needs to dominate the card and one or two supporting sponsors tucked into the footer.
Remember: if no second title sponsor exists, {{title_sponsor_2_logo}} outputs an empty string, leaving a broken <img src=""> in the DOM. Wrap individual sponsor tags in a container you're happy to see empty, or use the pre-rendered blocks instead.
Tips and troubleshooting
Use inline CSS or a <style> block — not a linked stylesheet
When the browser renders your card for printing, it won't be able to fetch an external stylesheet from a URL in a <link rel="stylesheet"> tag. The request either times out or is blocked. Put all your CSS inside a <style> block in the <head>, or write it inline. The worked example above shows the correct approach.
Scripts are removed and the card is shown in a locked-down frame
Your template is cleaned when you add it and then shown in a sandboxed frame that only allows images, styles and fonts. Scripts, forms and links to other pages do not work, which keeps the dashboard safe. A printed card does not need JavaScript: do the layout with CSS.
Image URLs must be absolute and publicly accessible
The {{qr_url}} and {{logo_url}} tags output full https:// URLs that are publicly accessible — the server fetches them server-side, so they work without authentication. If you want to add your own images (a club crest, for example), host them somewhere public — a CDN, an S3 bucket with public-read, your club's website — and reference them with an absolute URL in the src attribute.
Match the Page setting to your design, then confirm paper size in the print dialog
The template's Page setting (Landscape 297 x 210 mm or Portrait A5 148 x 210 mm) sets the print page size, so it must match your design. Keep an @page { size: 148mm 210mm; } rule in the file too. The printer driver has the final say. When you open the print dialog, check that the paper size is set to A5 and margins are set to None. Most browsers respect the @page rule by default but some printer drivers override it. A quick test print on plain paper before show day catches any mismatch.
Test with a real entrant before printing the full run
After adding your template and choosing it on the show, go to the registrations list and print a single card for one entrant. Check that the merge tags have all resolved, the layout holds at A5, and the QR code scans correctly with a phone camera. Only then print the full batch.
The template is the full page — include <html> and <body>
Unlike some template systems that inject content into a wrapper, Car Show Expert uses your file as the complete HTML document. Include the full document structure:<!DOCTYPE html>, <html>, <head>, and <body>. A fragment with just the card content will still render but you won't be able to set character encoding, page size, or document-level styles reliably.
In summary
- Add a .html file under 200 KB under Card templates (Pro plan only), then choose it in the Custom dash card template drop-down on Edit Show
- Pick Landscape (297 x 210 mm) or Portrait A5 (148 x 210 mm) as the template's Page setting; it sets the print page size
- Editing or replacing a template changes the cards of every show that uses it
- Use merge tags like {{entrant_name}} and {{car_number}} — the server fills them in at print time
- Put all CSS in a <style> block in the <head> — external stylesheets don't load at print time
- Scripts, forms and event handlers are removed, so do the layout with CSS
- Set @page { size: 148mm 210mm; margin: 0; } for A5 portrait, then confirm paper size in the print dialog
- Use {{title_sponsors_html}} for quick sponsor drop-in, or individual tags for precise placement
- Host any custom images at public https:// URLs — the server fetches them server-side
- Test a single card before printing the full run